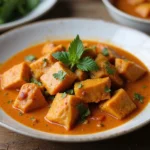
Red Thai Curry is a vibrant and aromatic dish that embodies the essence of Thai cuisine.
With its bold flavors of coconut milk, fresh herbs, and spices, it’s a comforting meal that warms both the body and soul.
I fell in love with this dish while attending a cooking class in Thailand, where the intricate balance of flavors left a lasting impression on me.
Whether you’re looking for a quick weeknight dinner or a dish to impress guests, this easy homemade recipe delivers satisfying results with minimal effort.
The History and Cultural Significance
• Red Thai Curry traces its origins to Thailand, where it has been a staple in Thai cuisine for centuries.
• The dish evolved over decades as chefs experimented with local ingredients, blending spices and herbs that showcased the region’s rich culinary heritage.
• In Thailand, this dish traditionally appears at family gatherings and festivities, symbolizing unity and the joy of sharing a meal.
• While many variations exist across different regions, the authentic version maintains the use of fresh red curry paste that sets it apart from imitations.
Recipe Overview
Nutritional Information (per serving)
Ingredients
Essential Equipment Guide
High-Quality Chef’s Knife: A sharp chef’s knife is crucial for efficiently chopping vegetables and proteins, ensuring uniform pieces for even cooking. Look for a comfortable handle and a blade made from high-carbon stainless steel for durability.
Non-Stick Skillet or Wok: A non-stick skillet or wok allows for easy cooking and prevents sticking, especially when sautéing the curry paste. Ensure it has a thick base for even heat distribution and is compatible with your stovetop.
Measuring Cups and Spoons: Accurate measuring tools are essential for achieving the right balance of flavors in your curry. Invest in a set that includes both dry and liquid measuring tools for versatility.
Preparation Methods
Chopping Vegetables: Uniformly chop vegetables to ensure they cook evenly. Use a sharp knife for clean cuts, and consider cutting them into bite-sized pieces for easier eating. Practice your knife skills to enhance speed and precision.
Sautéing: This technique involves cooking ingredients quickly in a small amount of oil over high heat. It’s crucial for developing flavors in the curry. Stir frequently to prevent burning and ensure even cooking.
Simmering: Simmering is done at a low temperature where small bubbles form. This allows flavors to meld together beautifully in the sauce. Keep an eye on the heat to maintain a gentle simmer without boiling.
Step 1: Prepare Ingredients

Gather all your ingredients before starting to cook.
Wash and chop the vegetables into uniform pieces for even cooking.
Measure out the spices, curry paste, and coconut milk to streamline the cooking process.
Having everything ready will help you cook efficiently and reduce stress.
Step 2: Heat the Oil

In a large skillet or wok, heat the vegetable oil over medium-high heat.
Allow the oil to shimmer but not smoke, indicating it’s hot enough.
This step is crucial for sautéing the protein and vegetables properly.
Swirl the oil around the pan to ensure even coverage.
Step 3: Cook the Protein

Add the cubed chicken or tofu to the hot oil in the skillet.
Cook for about 5-7 minutes, stirring occasionally until browned on all sides.
Ensure the protein is cooked through for food safety and optimal flavor.
Remove the protein from the skillet and set aside once done.
Step 4: Sauté the Curry Paste

Add the red curry paste to the same skillet.
Sauté for 1-2 minutes until fragrant, which helps release the flavors.
Stir continuously to prevent the paste from burning.
This step is essential for developing the depth of flavor in the curry.
Step 5: Add Coconut Milk and Broth

Pour in the can of coconut milk and vegetable broth into the skillet.
Stir well to combine with the sautéed curry paste for a smooth sauce.
Bring the mixture to a gentle simmer, which will help the flavors meld.
Make sure to scrape the bottom of the skillet for any stuck bits, ensuring a rich flavor.
Step 6: Incorporate Vegetables

Add the chopped bell pepper, zucchini, and broccoli to the simmering sauce.
Stir to coat the vegetables evenly with the sauce.
Let the mixture simmer for about 5-7 minutes until the vegetables are tender but still crisp.
Check for doneness and adjust the heat if necessary to maintain a gentle simmer.
Step 7: Add Seasonings

Stir in the fish sauce, brown sugar, and lime juice to the curry.
This step balances the flavors, adding depth and brightness.
Taste the curry and adjust seasonings as needed, enhancing your personal preference.
Allow the curry to simmer for an additional 2-3 minutes to meld the flavors.
Step 8: Serve the Curry

Remove the skillet from heat and let the curry cool slightly.
Serve the curry hot over steamed rice or noodles in bowls.
Garnish with fresh basil leaves and lime wedges for added brightness.
Enjoy the comforting flavors of your homemade Red Thai Curry.
Critical Timing and Temperature Guide
Cooking the Protein: Cook for 5-7 minutes on medium-high heat until browned and fully cooked. Look for a golden color and ensure the internal temperature reaches 165°F (74°C) for chicken. Avoid overcrowding the pan, which can cause steaming instead of browning.
Simmering the Sauce: Simmer for 10-15 minutes after adding the coconut milk and broth. Look for small bubbles and a slight thickening of the sauce. Avoid boiling vigorously, as this can separate the coconut milk.
Vegetable Doneness: Vegetables should cook for about 5-7 minutes until tender yet crisp. They should maintain their vibrant color and not become mushy. Stir occasionally to ensure even cooking.
Pro Tips for Red Thai Curry Recipes Easy Homemade Comfort Food
• Ingredient Selection: Choose high-quality red curry paste and fresh coconut milk for the best flavor.
• Preparation Secret: Sauté the curry paste longer for deeper flavor development, rather than just mixing it in.
• Temperature Management: Ensure the oil is hot enough before adding ingredients to prevent sticking.
• Texture Enhancement: Cut vegetables uniformly for even cooking and better texture.
• Flavor Layering: Add lime juice at the end of cooking to preserve its bright flavor.
• Make-Ahead Strategies: Prepare the curry paste in advance and store it in the refrigerator for up to a week.
• Restaurant-Quality Finishing Touches: Serve with a side of jasmine rice and lime wedges for a fresh touch.
• Equipment Optimization: Use a heavy-bottomed skillet to prevent hot spots and ensure even cooking.
Troubleshooting Common Issues
• Flavor Too Spicy: This can occur if too much curry paste is used. Add more coconut milk or sugar to balance the heat.
• Curry Too Watery: If your curry is too thin, simmer it longer to reduce the liquid. You can also add a cornstarch slurry to thicken it.
• Vegetables Overcooked: This happens if they’re added too early or cooked too long. Add them later in the cooking process for better texture.
• Too Much Coconut Flavor: If the coconut flavor is overwhelming, add a splash of lime juice to brighten and balance it out.
• Not Enough Depth of Flavor: If the curry lacks complexity, consider adding more fish sauce or a pinch of salt to enhance taste.
• Protein Not Cooked Evenly: Ensure the pan is not overcrowded and allow enough space for heat circulation.
Variations and Regional Differences
• Green Thai Curry: This variation uses green curry paste, which is made with green chilies and offers a different flavor profile. It often includes fresh green herbs for added brightness.
• Massaman Curry: Originating from Muslim influences in Thailand, Massaman curry is milder and features spices like cinnamon and cardamom, often cooked with potatoes and peanuts.
• Panang Curry: A thicker and creamier version that includes ground peanuts and is often served with beef, showcasing richer flavors.
• Modern Interpretations: Contemporary takes may include non-traditional proteins like duck or seafood, or even plant-based alternatives for vegan versions.
Food Science Behind the Recipe
• Emulsification: The process of combining coconut milk with curry paste creates a stable emulsion that enhances flavor distribution throughout the dish.
• Maillard Reaction: This browning process occurs when proteins are cooked at high temperatures, adding complexity and depth to the flavor of the chicken or tofu.
• Gelatinization: Cooking the curry thickens it as starches in the vegetables and any added thickeners absorb liquid, contributing to a creamy texture.
Frequently Asked Questions
What’s the most common mistake people make when preparing Red Thai Curry? Overcooking the vegetables is a common mistake, leading to mushiness. To prevent this, add them later in the cooking process.
Can I prepare components of this dish in advance? Yes, you can make the curry paste ahead of time and store it in the refrigerator for up to a week.
How do I adapt this recipe for dietary restrictions? Substitute chicken with tofu or tempeh for a vegan option. Use gluten-free soy sauce if needed.
What’s the best way to store and reheat leftovers? Store leftovers in an airtight container in the refrigerator for up to three days. Reheat gently in a skillet or microwave, adding a splash of coconut milk if it thickens too much.
Can I freeze this dish? Yes, freeze the curry in an airtight container for up to three months. Thaw overnight in the fridge before reheating.
What wine or beverages pair best with this dish? A crisp Riesling or a light Thai beer complements the spicy flavors beautifully.
How can I scale this recipe up for a crowd? Simply multiply the ingredient amounts by the number of servings needed, ensuring you have a large enough pot for cooking.
What side dishes complement this recipe best? Jasmine rice, steamed vegetables, or a fresh Thai salad enhance the meal.
How do professional chefs elevate this dish for restaurant service? Professional chefs often use higher-quality ingredients and present the dish with artistic garnishes, like edible flowers or microgreens.
Serving and Presentation Guide
• Traditional Presentation: Serve Red Thai Curry in a deep bowl, topped with fresh basil and lime wedges. Use a traditional Thai-style serving dish for authenticity.
• Modern Plating Ideas: For a contemporary look, use a wide-rimmed plate and create a colorful swirl with the sauce, garnishing with microgreens and a drizzle of coconut cream.
• Accompaniment Suggestions: Pair with jasmine rice, cucumber salad, or Thai spring rolls for a complete meal.
• Special Occasion Presentation: For celebrations, serve the curry in a carved-out coconut or pumpkin for an impressive centerpiece.
Conclusion
I hope this Red Thai Curry recipe inspires you to bring a taste of Thailand into your home.
With its rich flavors and comforting warmth, it’s sure to become a favorite in your household.
Don’t hesitate to experiment with ingredients and make it your own, as every cook has a unique touch to offer.